Have you ever held a baby chick? They are the most adorable little fluff balls that seem to be made of nothing but feathers.

This post contains affiliate links. Opinions are my own.
I grew up in a rural community that featured a main street chick hatchery. Inside this magical store racks and racks of eggs carefully rotated in giant incubators. As spring approached, chicks began to peck their way into the world and were purchased for area farms and Easter pets.
It was an amazing sight to see as a child.
My children are suburb dwellers, so their contact with chickens is generally limited to storybooks and nature programs on television. A real chick would certainly be an exciting Easter basket treat, but would quickly become a troublesome house guest.
These Simple Pom Pom Baby Chicks are designed to thrill and delight your children…while saving you the headache of a new pet chicken!
Simple Pom Pom Chicks
This simple Easter craft can be made in minutes using basic craft supplies. Add an empty egg shell and you have an adorable baby chick to add to an Easter basket…and he is the most considerate pet.
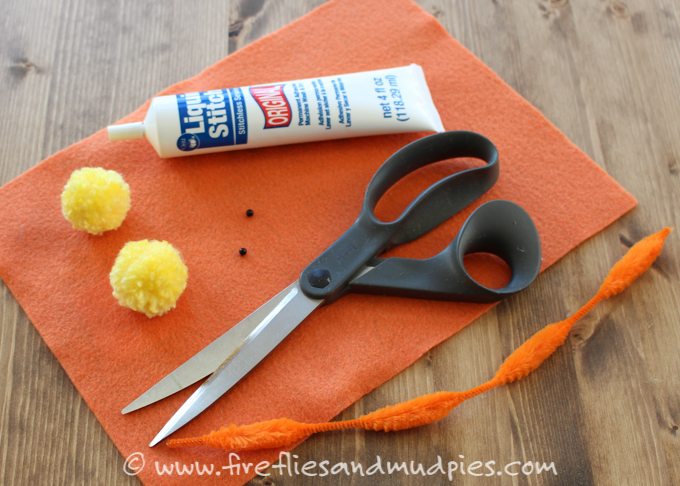
Materials:
- yellow yarn
- yellow embroidery floss or thread
- hand sewing needle
- 4 mm black beads for eyes
- orange chenille craft stems
- orange craft felt
- fabric glue or school glue
- scissors
- table fork
Directions:
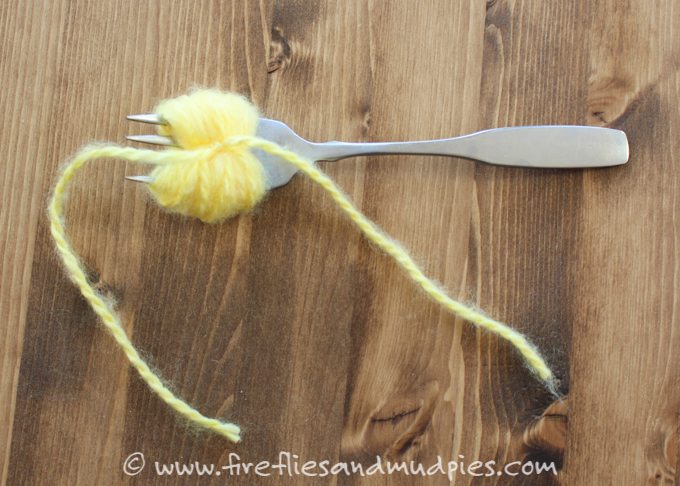
Pom poms are easy to make with a fork. It may take you a try or two to get the hang of this technique. Don’t get discouraged, you will soon be a pro!
First, cut a 6-8 inch piece of yarn and thread through the middle tines of a fork. This will be the center tie to hold the pom pom together. (Tip: If your yarn is weak or prone to breakage use embroidery floss for your center tie.)
RELATED: Plastic Egg Chicks
Wrap the yellow yarn around the tines of the fork 40-50 times. The more yarn the fluffier the pom pom.
Tie the center tie around the yarn twice, pulling as tightly as possible. (Tip: Have a partner hold the string down with their finger as though you were tying ribbon on a present.)
Slide the yarn off the fork and cut through the loops on both ends. (Do not cut through the center tie.) Trim the ends of the center tie the same length as the pom pom.
Roll the pom pom in your hands to shape it into a ball and trim into a perfect sphere.
Repeat steps 1 to 5 to make a second pom pom then assemble chick in steps 7–12.
Use yellow thread or embroidery floss to stitch the pom poms together. Try to get the needle through the center tie of each pom pom. (Tip: You can also glue the pom poms together, but thread is more secure.)
Cut two tiny triangles from craft felt for the beak.
Use glue to attach the beak and bead eyes. Make a small divot in the yarn to hide the glue.
Cut legs from the chenille stems. The narrow part of the stem is the leg, cut though the wide part to make a triangle shaped foot.
Attach the legs to chick with a drop of glue. Make sure they are inserted at least 1/4 inch into the pom pom. Bend the stems at the ankle to create a foot.
Enjoy your Easter pom pom chick!
More Pom Pom Fun
Baby birds are a sure sign of spring! Check out these adorable pom pom friends for your baby chick.
Click the image to visit Bren Did and learn to make this sweet little duckling.
Click the image to visit The Magic Onions and learn to make this sweet little duckling.
Bren is an craft fanatic, clean freak, and kitchen mess maker. She shares her passion for simple crafts, green cleaning, and real food recipes on her blog, Bren Did. Her work has been featured on the Huffington Post, One Green Planet, and Hometalk.


First School of Desert says
This is really a nice post. Kids will love this activity.